Copyright © Some People Say
Design by Dzignine
Showing posts with label Crochet. Show all posts
Wednesday, May 27, 2020

Baby Mouse Hat

I crocheted this little beanie for my coming second baby who will arrive in December 2020. It's the year of rat so I thought of making a micky/minnie mouse hat for my newborn.

Baby Mouse Hat 


It'll surely look much cuter when it is put on. Not a difficult project.

Crochet hook size: 4.5 mm (I think)
Yarn: Double strand Golden Sun 100% cotton
Pattern: https://www.youtube.com/watch?v=FKqTFcYirHQ
Time taken: within 1 day

It'd be best to make the two stripes longer.. but it's okay. It's for a newborn size. I just wanted my little one to stay warm when in the hospital after labour.

Puff Stitch Crochet Toddler Dress

I made this little dress for my daughter, Camille's coming 2 yo birthday. This is gonna be her dress on that day when we celebrate it at home.

Puff Stitch Crochet Toddler Dress 

Crochet hook: 4.5 mm
Yarn: Golden Sun 100% cotton fine yarn
Time taken: About a week
Pattern: https://www.windingroadcrochet.com/puff-stitch-crochet-toddler-dress-pattern/
Size: 24m

I noticed some errors in the pattern from the website. I have notified the owner. Unsure when it'll be rectified. As you crochet along, you'll notice the errors and make necessary changes based on the pattern.

Supposedly, I think I should use a smaller crochet hook as my yarn is quite fine. This hook size creates a soft and airy dress.


I have to edit the pictures with Photoshop CS6 to make them look more realistic to the actual object. The camera sometimes doesn't capture the exact colours.

This is definitely a pretty princess looking dress. As I've used a slightly bigger hook size, I believe she can wear this for sometime. As it is airy, maybe it'll look good with a mono colour blouse underneath.

Thanks for the free pattern. A fun project for sure.

I started this project when I went to the clinic to open up a book new for my second pregnancy. It finished very quickly.


Wednesday, May 16, 2018

Tote Bag

Tote Bag

I made these 2 bags for 2018 Teacher's Day gift exchange. One for my husband and one for mine. I took the white. He took red.

For the bag, I used this tutorial:


I made some mistakes when I'm sewing the inner. I noticed I need to make it bigger/wider than the bag. When it's made same size, it cannot fit that well. So, I have to cover it with embellishment. 

I used this tutorial for the flower: 


Size: small for this bag
3.5mm hook 
DK yarn : 5股牛奶棉 

For the bag, I used 厚棉 6mm hook 


Sunday, April 08, 2018

Baby Booties

Baby Booties


I modified this pattern. I find with a pompom, it looks soooo much better. It looks weird earlier. 
Maybe it's because I'm using a finer yarn. 
It'll look much more normal when it is done with the yarn recommended in the tutorial.


I doubled the stitches. Then for the cuffs, I crocheted around a few times. Added a pom-pom. 
Size 13 knitting needles
Green Golden Sun cotton yarn

Tuesday, March 27, 2018

Simple Baby Jacket


This is the first baby jacket I crocheted. And it's gonna be for my special little one who will be arriving in June 2018. Daddy and Mommy can't wait to see you but at the same time, Mommy is afraid of all kinds of odds (first time mama).


I referred to the above tutorial. These are the materials that I used: 
When I made the swatch, I got 6cm instead of 10cm. So, I knew that my end product will be smaller if I were to follow exactly the newborn size. So, I followed instructions for 12 months size. I wouldn't say my end product is exactly newborn size according to diagram. Overall it's the same except the neckline area is a little more narrow. It doesn't matter much if I don't button till the top. 

Neck edge: Follow 12 months size 
Body length: Follow newborn size 
Sleeves: Follow newborn size
However, I made some modifications because I don't like how it originally looks like according to the pattern (shapeless long log shape). So, I wanted the sleeves to look like from big to small. These are the modifications done:
Row 1 - 5: 32 dc
Row 6 - 8: 30 dc
Row 9 - 13: 28 dc  
Button band: Follow pattern exactly 
Buttonhole band: I crocheted one row of sc before I made the buttonholes row. I used 2 chains instead of 1 chain for buttonhole. 

Overall, this is a fairly simple project for beginners. I followed 70% of the tutorial from written instructions instead of depending on the video. It was a fun project, not to mention, super adorable mini jacket. 

Neck edge 

The body part 

End result 
There's supposed to be another button at the bottom but I felt it's unnecessary after sewing 4 buttons.


Friday, May 19, 2017

Moon Water Clutch (Crochet)

Another clutch completed for Mommy to carry on my wedding in June. =)
I don't have much colour choices of yarn left..
I needed pink because her dress is in hot pink and black.
So, after digging my stash of yarn collection, then I found them.

Moon Water Clutch (Crochet) 


Used a magnet button and made the clutch looks even more elegant. 

I sew the inner cloth myself. 
I have a tutorial HERE

Lying flat on the ground. 
Inside has a cardboard, so the clutch can 'stand'

I always enjoy the crochet part and when it comes to sewing the inner bag and stuff, I will get lazy.

Monday, May 08, 2017

Crochet Puffed Star Stitch Clutch Wallet Purse

I have just completed a clutch for the teacher I picked for 2017 Teacher's Day gift exchange. I hope that Puan Mariam will like it.


I used her tutorial -  


This is not the first purse/bag that I made using her tutorial. It's always great. =) Thank you for being so generous to share all these wonderful and easily understood tutorials. 

I made using 5 ply milk cotton yarn. I used 1 and a half skeins of 50g yarn. The crochet hook size is 7/0 (4mm). This mustard yellow is one of my favourite colours. I love how pretty the colour is as a clutch. 

I spent one or two weeks on this clutch; on and off project due to busy wedding schedule. 

What I'm proud of is that I made the inside cardboard myself. I sellotaped two times per surface area to ensure it is hard enough. I initially wanted to laminate the calendar cardboard that I cut out according to the clutch pocket size; but later I think, it is not going to make much difference because the laminating film is kind of light either. 

It is sturdy enough, not the typical crochet soft and bending kind. 

I love the inside pocket cloth too. Coincidentally, yes, I'm not good at measurements usually.. I managed to get everything sized properly to fit nicely. I love hand sewing machine stitches though it is a slow and tedious process. I still cannot hand sew very neatly but this is the best that I can afford to do. 

I hope that she's gonna like it. I guess this clutch is going to worth more than RM15 (that's the minimum cost for per gift exchange).

Saturday, February 04, 2017

Man's Sweater

I made this sweater for him. It's one of the projects for my coming Korea honeymoon trip. I hope the trip will proceed as planned.. =( I was told that they were still lacking of 4 people to confirm the tour.

I followed this tutorial: http://knitted-patterns.com/knitting-for-men/pullovers-sweaters/4014-mens-v-neck-sweater-free-crochet-pattern

I used 3.5mm crochet hook for the ribbing. It looks tighter and neater in my opinion. I decreased the number of rows because I initially thought the ribbing was too long. I was wrong. I should have followed the tutorial.

For the entire sweater, I used 4.5mm crochet hook.

The yarn used is 7 ply Tang Sheng cotton milk yarn.

I used approximately 7 skeins of yarn; 100g each.

It is definitely a thick and heavy garment. I believe it should be warm enough.. I didn't have him by my side when I crocheted this sweater. So, I used a polo T that he left behind, and eyeballed the measurement. He tried it on a few days ago. I forgot to take a photo. I'll update again.

I followed the smallest size of the tutorial. Everything in the tutorial is great to follow, except some parts where I feel there's a mistake. I decided to follow my instinct.

I took around 1 - 2 months if I'm not mistaken, to complete this sweater. Ended this project on 14 January 2017.

Flash light.
The back part.

The colours look more natural here.

The front piece, half way through


My sweater and scarf.. 
His is still in progress


Done


Everything is great, except maybe it is a little stiff. 
That's why I dislike crochet garment.
I think knit garment looks much better because it is more malleable. 

Summary
Wednesday, November 30, 2016

Crochet Raspberry Stitch Stripes Long Sleeves Sweater

I'm getting married next year!! Wheeee - - - !

My spouse and I have decided to go to Korea for honeymoon. We've already booked the tour and everything. What left now is just the garments.

I'm so excited actually, wanting to know how it feels to be at a place with 0-8 degree Celsius.

I wanted to try to knit a sweater instead of regular crochet but I failed. It's difficult. I am still very new to knitting and I think I need to race with time. So, I cannot afford to waste too much time learning how to knit a sweater. It'll be too difficult and time consuming for a newbie to do all by herself without a guru.

Many people think it is impossible to learn a skill without finding a teacher. Guess what? This is a false concept that people use to disguise their unwillingness to learn with determination. Youtube is one of the best teachers in the world. I really appreciate these youtubers who are willing to spend their time making money and teach the world for free.

I'm grateful to acquire the crochet skill from Youtube.

Crochet Raspberry Stitch Stripes Long Sleeves Sweater 


These taken with Panasonic Lumix DMC FH5

Taken with Sony Xperia ZL camera 


I used 7 ply Milk Cotton yarn from Tang Sheng (with black label)
4.5mm crochet hook for single crochet stripes and 3.5mm crochet hook for the raspberry stripes.
5.5mm crochet hook for bottom ribbing. 
I think I used around 3 skeins of white and 3 skeins of blue yarn (each skein is 100g) 

Throughout the process of crocheting this sweater, I had to rip off a few parts many times before I got them right. Each time I unravel the yarn, I told myself it's okay, I'm doing this for a better and more fitting garment, it is going to be worth it. Gah! Finally - I pushed through and managed to get a sweater that I'm pretty happy with. 

If only I was fairer, I think I'll look more Korean-ish with the hairstyle and specs. Haha. 

I took around 3 weeks to get this sweater done. Done in a hurry, not in the leisure mode. I spent a few hours each day, repairing and repairing until I am satisfied. 

Before I end this post, I'd like to thank Interunet from Youtube for teaching me how to crochet this garment. Her video tutorial is by far the best on Youtube. This is the #3 garment that I did following her tutorial. 
Friday, June 24, 2016

Women's Square Motif Lace Blouse (tutorial by Interunet)

It's been AGES since I last blogged something. I have been busy with many things.. Working, on diet, preparing for my wedding and of course, crocheting. So, here's the project which I have spent months on. Finally done. Haha..

This colour is closer to its original colour. 


The colour is a little off here. It's not supposed to be this bright.
My camera's setting is set wrongly. Showing this picture so that you can see how it looks like when lay flat on the ground.


It's my blog, so I'm going to post all my pictures HUGE.
Hahahahaha


A close-up one.


I used Golden Sun cotton yarn with 2/0 Tulip crochet hook to make this blouse. I'm supposed to use 2/0 but I accidentally mix up some motifs with 1/0. Haha.. Luckily, it didn't turn out too weird as I only did the mistake on a few rows of motifs (yes, few rows and then only I realize.. zzz).

The original neckline I envisioned is not like this. It's more of an off shoulder kind. However, since this is made for my grandma, I cannot expect her to be wearing such sexy outfit. So I made the neckline part more narrow so that it looks more decent for an old lady to wear.

I cannot really remember how many skeins of yarn I have used. Maybe around 5-6 skeins. 

I used the tutorial from Interunet: 


May God bless this talented and selfless lady for sharing all her great tutorials on Youtube. I managed to crochet 2 pieces of garments using her tutorials.

Though I did face some problems at the beginning but soon, I figured out how to fix it. Ah - took me some time to see the pattern properly (haha! I am just an amateur crocheter). I think I took about.. almost 4-5 months doing this piece of blouse. Yes, that long! It's been on and off work because of other commitments I have in life.

So, after trying this blouse for photographs, I'll give it to my grandma this weekend. I hope that she'll like it. 


Friday, March 18, 2016

Recycled 'Crystal' Plastic Bottle - Yarn Tutorial

Recycled 'Crystal' Plastic Bottle - Yarn Tutorial

MATERIALS
  • 3/0 crochet hook (2.2mm) 
  • Minlon acrylic knitting yarn 
  • yarn needle 

1) Cut the bottom of the mineral bottle to approximately 5.5cm diameter. 

2) If you are using bottom bottle that looks like in the picture below, you should be able to get 20 holes.
 

3) In the first hole: Tie a knot to your string and slip stitch in the first hole (see picture 1). Chain 1 (see picture 2). 2 single crochets in the same hole (see picture 3).  

4) In the second hole: 3 double crochets. 

5) In the third hole: 3 double crochets. 

6) In the 4th hole: 2 single crochets 

7) In the 5th  hole: 2 single crochets 

8) In the 6th hole: 2 single crochets 

9) In the 7th hole: 3 double crochets 

10) In the 8th hole: 3 double crochets 

11) In the 9th hole: 2 single crochets 

12) In the 10th hole: 2single crochets 

13) In the 11th hole: 2 single crochets 

14) In the 12th hole: 3 double crochets 

15) In the 13th hole: 3 double crochets 

16) In the 14th hole: 2 single crochets 

17) In the 15th hole: 2 single crochets 

18) In the 16th hole: 2 single crochets 

19) In the 17th hole: 3 double crochets

20) In the 18th hole: 3 double crochets 

21) In the 19th hole: 2 single crochets

22) In the 20th hole: 2 single crochets 

* You  might find this confusing but once you get one done, you will know the pattern by heart. You do not have to refer to the steps above anymore. 

23) Slip stitch to the first chain made in the first hole. (see picture 10) 

24) Chain 1. Single crochet in every stitch until you reach the first double crochet stitch (see picture 12). 

25) Double crochet 2 times in the space between the two double crochets (see picture 14) 

26) Continue to single crochet in every stitch until you reach to the next 2 double crochets stitches. Repeat step 25. It's to make the edges. 

27) Repeat the single crochet and double crochet in the spaces steps until the entire round is completed. Slip stitch to the first chain made in step 24. 

28) You should have a granny square now with sharp edges (see picture 26). 

29) Weave in the extra yarn into the granny square. (see picture 27). 

30) You should now have a clean granny square (see picture 28).

31) Repeat the steps above to make the sufficient number of granny squares needed for your project.


31) Arrange the squares according to the pattern that you like. 

The above layout is to make the pencil box as shown below: 


There are different layouts: 


Another type of layout:


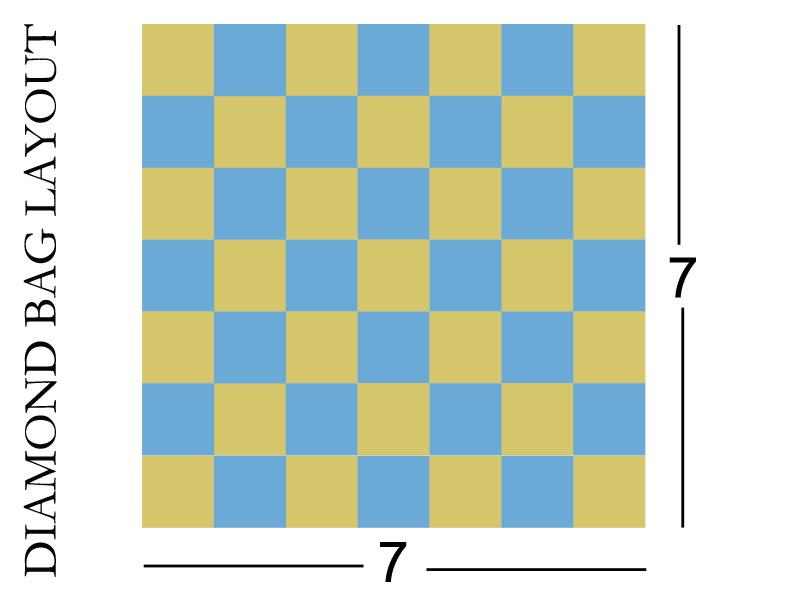
The crystal diamond bag layout: 


32) Start joining the squares starting from the middle square.  

33) Make sure the pattern of the water bottle bottoms are facing each other inwardly (see pictures 29 - 30) to make sure you get the correct pattern. 

34) Slip stitch in between the space of the two double crochets at the edge (see picture 31). 

35) Chain 1 (see picture 32).

36) Slip stitch the stitches combining two squares together until you reach the double crochets' space (see picture 34). 

37) When you reach the 2 double crochets space, slip stitch into the space. Chain 1. Join another square by joining the edge via the double crochet space. Basically the joining process is quite similar to joining traditional granny squares. 


38) You should get something like this. You will have to cut the yarn and continue a new yarn with the same joining process when you joined the last square. 


39) From the double crochet space, slip stitch and make 3 chains as seen in the picture below. 


40) Make double crochets across the entire round. In each double crochet space, make 1 double crochet. 

41) After you have completed the double crochet round, then make 3-4 rounds of single crochet round. Slip stitch to the third stitch of your starting 3 chains. Then chain 1, start to single crochet across. 


42) Weave in the remaining yarns. 

43) Sew on the zippers. 

44) Done.

I hope you enjoy making this crystal plastic bottle - yarn products.