. . . . S T A T U S
Mood : so-so
Hello everybody! I am here again! ; ) Umm.. So far, I'm still sick. In fact, it didn't get any better this morning until I went to visit the doctor. = (Then, RM 30 is burnt because I am no longer under the "protection" of ING company. Huhuhu.. RM 30 for fever, sore throat and antibiotic medicine and 1 bottle of gargle solution. The consultation fee is RM 10 usually. So, I think it is not really VERY expensive but still.. = / Pocket got hole already.
Boyfriend will be very busy with his work again because today is Monday. He is busy from Monday to Friday. = ( That means, we are not going to have much contact for 5 weekdays until weekend. = ( I hope that he will read my blog so that he knows my happenings around here although we don't see each other.
I didn't go to work. I slept for a few hours after taking my medication. I felt much better when I woke up. Then, brother was watching Singapore ghost comedy movie 鬼也笑 The Ghost Must be Crazy. Haaa.. It's a very funny ghost comedy movie. There are moments when you will feel goosebumps but most of the times, you will be hugging your popcorn and laugh bwahahahaha... It's quite a new movie - 2011 released. Have fun watching especially when you are down/emo.
Today I'm gonna update about :
How to make hair curly without an iron?


This idea does not originate by me. I actually watched a video via you tube and tried it myself.
So, here's some sharing of my experience.
My hair is straightened earlier.
So from straight to slight curve.
AMAZING? Try it.
Why I want to use this tutorial?
For temporarily curls.
For healthy curls.
For fun, a quick change for a day.
What do you need?
Scissors (NOT to cut your hair)
A piece of old rag
Comb
QUESTIONS? DOUBTS?
QUESTION 1: How long will the curls stand?
Answer : 2 days if you don't get in contact with water.
QUESTION 2 : What happen if I sweat with these curls on my head?
Answer : A little will not do harm but if you sweat your whole head, say bye-bye to your curls.
QUESTION 3 : Is it troublesome to do this tutorial?
Answer : Practice makes perfect. No short-cuts. It takes about 10 minutes or less if you are good at it.
QUESTION 4 : How curly are the curls?
Answer : Extremely curly (the result is like curling your hair with a real iron, that curly).
QUESTION 5 : Is this tutorial time consuming?
Answer : YES. Don't do this if you don't have time. It needs about 1 night time to get your curls ready to see the world.
QUESTION 6 : Between braid curls and this curls, which curls last longer?
Answer : I have tried both before. Braid curls loose out very fast no matter how hard I tie them. I think this curl lasts longer. Why? I don't know.
1. Cut a rag into pieces.
Get a piece of old rag (clean one, please).
Then get a pair of scissors.
Cut the rag into stripes of length approximately a 20 cm long ruler and 2 cm width.
In short, get a ruler with 20 cm long, then cut the rag approximately the shape (length + width) like the ruler will do.
This is usable for next time.
-Sorry no photo because I did this tutorial long time ago. Just thought of taking it out to be shared-
2. Wash your hair.

This is not a good photo of me.
I don't know why I put that kind of expression in front of the camera.
Anyway, ignore that. What important here is that:
Please wash your hair with shampoo and adequate conditioner.
It is important to wash your hair before trying this tutorial because your curls will not look good or smell good to people around you when they are oily and smelly?
So, please remember to wash before doing this.
3. Dry your hair with towel until moderately dry.
I think this is needless to explain.
No picture is provided because everybody knows how to dry their hair.
Please do not use hair blower unless you are really in a big rush
(This tutorial is not for people who do not have time).
4. Separate your hair into half and start tying.
This cannot be explained through words clearly.
Please view the video at the bottom most of this post.
The results after tying:

Front view
I look atrociously like a crazy woman here.
Trust me, the outcome worth the ugly moments.

Back view.
It's my first attempt tying knots like that on my hair.

Back view.
I hope you got the knots tight and firm on your hair!
; )
5. Give it some time.
After tying the knots of hair with the pieces of rag, give it some time for the magic to form.
This is too descriptive.
In simple language, wait.
Wait how long?
Approximately 2 hours?
For mine, I only waited for about 2 hours and I untie the knots impatiently.
I want to know the results.
2 HOURS LATER

Please focus only at my hair.
This is HOW CURLY the hair turns to after untying the knots of pieces rag.

I know I look sibeh ah-ma (grandma) here.
This tutorial doesn't guarantee immediate good looking but....
It WILL look good the next day.
Don't trust me?
Have a look yourself!
I went to bed with the hair shown in the above photo.
After one night..............

I like my eyes here. =P
My face is sharp here.
Bwahahaha..
I love self-praising. XD

Hello........

Get back to the serious talk.
The curls loosen a little.
However, it looks much natural the day after untying the knots.
Look at what I mean? /\
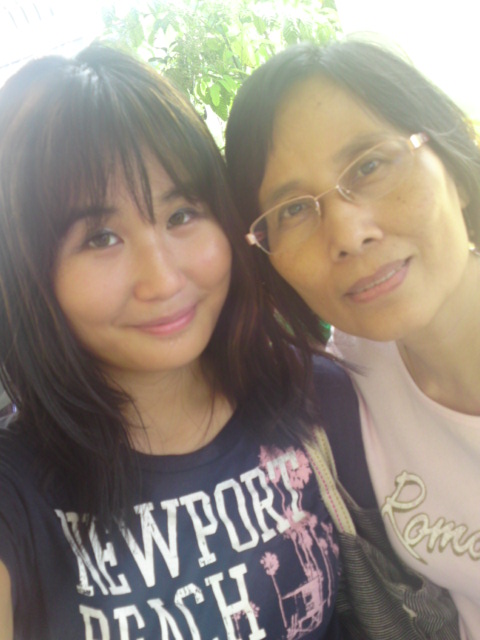

My mom and I.
At church.
Dark blouse. You probably can't see the curls well. = (

That's me!


My brother and I.
Look alike.
Look properly, we DO!

Look at the curls again............
I'm so deadly trying to show you........


These photos are brighter.
Are they more obvious here?
My curls - - -
I love curly hair.
Not my natural curls, though.
; ) Curls make me look more matured btw.
The original video where I learn this tutorial from.
The video shows using paper bag but I'm using old rag.
I think rag is more lasting compared to paper bag stripes.
I hope that this post is informative and doesn't make you fall asleep.
; )


nice post. you and your boyfriend are both really sweet together.
ReplyDeleteThanks. The person in the photo is my brother, not my boyfriend?
ReplyDelete